Google gcloud平台安装V2Ray,设置防火墙,设置动态DNS
注:一定不用忘记打开Linux本身的防火墙ufw
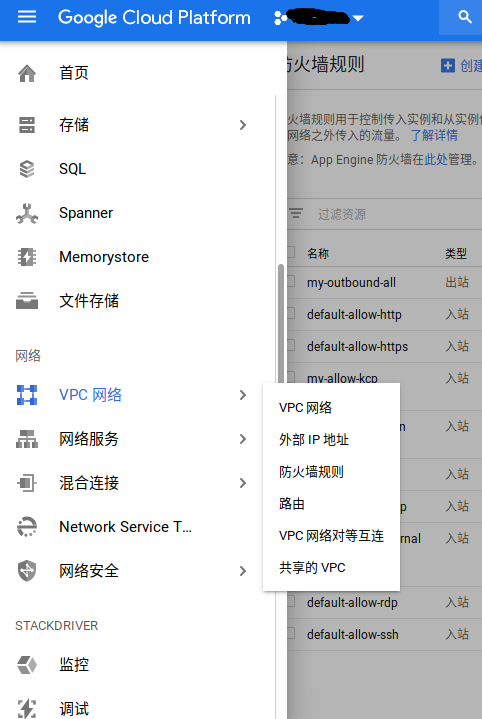
使用防火墙规则
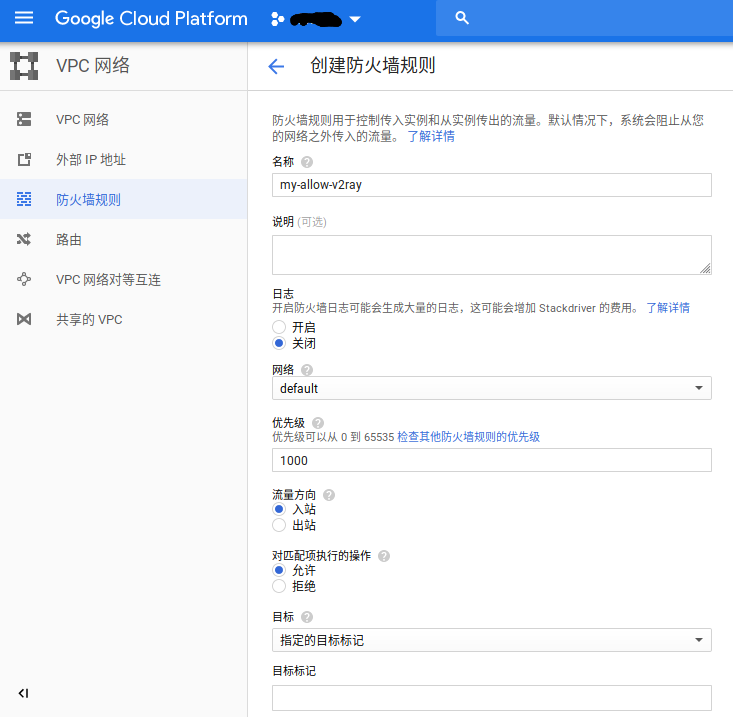
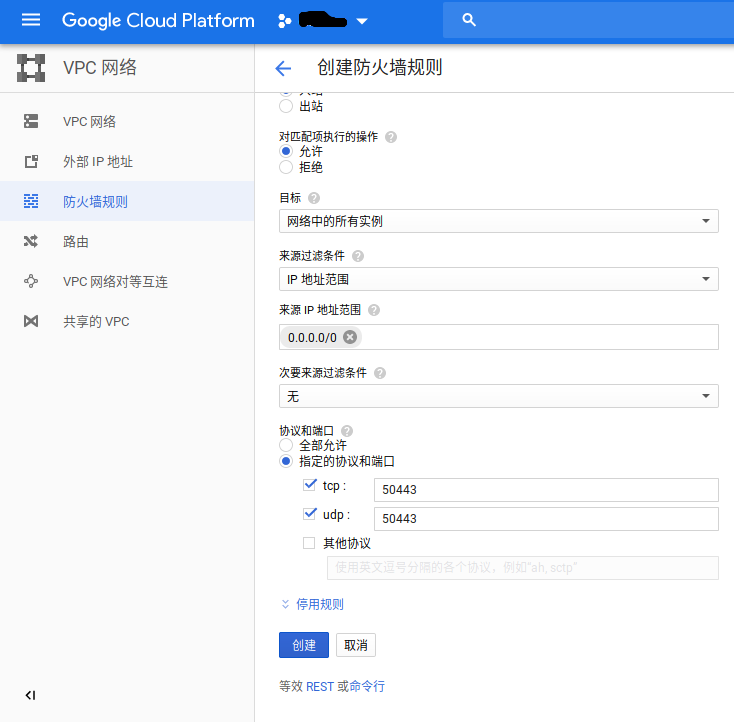
首先创建规则,创建一个从外面可以访问50443端口的规则my-allow-v2ray
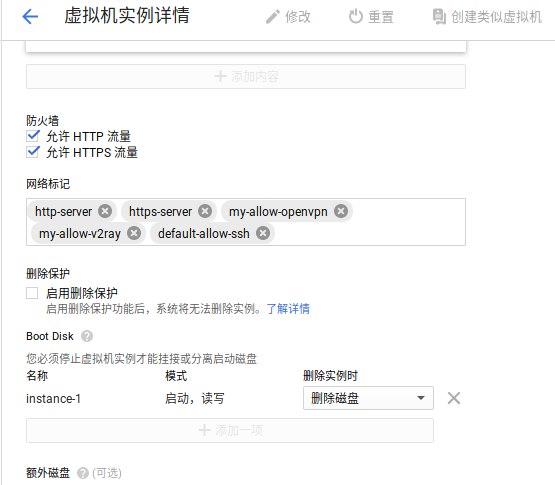
然后在Compute Engine实例中使用这些规则
最后,还需要在Linux的防火墙里添加规则
1
2
3
4
5
6
7
8
9
10
11
12
13
14
15
16
17
18
19
20
21
22
23
24
25
26
27
28
29
root@instance-1:/etc/v2ray# ufw allow 50443/tcp Rule added Rule added (v6) root@instance-1:/etc/v2ray# ufw allow 50443/udp Rule added Rule added (v6) root@instance-1:/etc/v2ray# ufw status Status: active To Action From -- ------ ---- 22 ALLOW Anywhere 1194/udp ALLOW Anywhere 443 ALLOW Anywhere 80 ALLOW Anywhere 2295/tcp ALLOW Anywhere 2295/udp ALLOW Anywhere 4443 ALLOW Anywhere 50443/tcp ALLOW Anywhere 50443/udp ALLOW Anywhere 22 ALLOW Anywhere (v6) 1194/udp ALLOW Anywhere (v6) 443 ALLOW Anywhere (v6) 80 ALLOW Anywhere (v6) 2295/tcp ALLOW Anywhere (v6) 2295/udp ALLOW Anywhere (v6) 4443 ALLOW Anywhere (v6) 50443/tcp ALLOW Anywhere (v6) 50443/udp ALLOW Anywhere (v6)
Dynamic DNS (no-ip.com) 因为gcloud compute instance每次关机的时候对外IP都可能变。而且如果以后换别的VPS,客户端也需要改配置里的IP.使用动态DNS注册一个域名,在服务器上运行一个程序,会把服务器的IP自动发到动态DNS上。以后使用域名就可以不用担心IP变了。
有很多免费的动态IP服务。以no-ip.com为例。先到no-ip.com用邮箱注册一个域名myname.ddns.net.除了ddns.net后缀,还有几个其他选择。
然后按照下面说的方法在gcloud上安装运行no-ip.com客户端。
NoIP: How to Install the Dynamic Update Client on Linux
参考以下方法在Debian上讲noip2设置为开机自动启动服务器
run automatically noip2 when the machine is booted
Two steps for you to solve this. Your script (/etc/init.d/noip2) should look like:
1
2
3
4
5
6
7
8
9
10
11
12
13
14
15
16
17
18
19
20
21
22
23
24
25
26
27
28
29
30
31
32
33
34
35
36
37
38
39
40
41
42
43
44
45
46
47
48
49
50
51
#! /bin/sh DAEMON=/usr/local/bin/noip2 NAME=noip2 test -x $DAEMON || exit 0case "$1 " in start) echo -n "Starting dynamic address update: " start-stop-daemon --start --exec $DAEMON echo "noip2." ;; stop) echo -n "Shutting down dynamic address update:" start-stop-daemon --stop --oknodo --retry 30 --exec $DAEMON echo "noip2." ;; restart) echo -n "Restarting dynamic address update: " start-stop-daemon --stop --oknodo --retry 30 --exec $DAEMON start-stop-daemon --start --exec $DAEMON echo "noip2." ;; *) echo "Usage: $0 {start|stop|restart}" exit 1 esac exit 0
Then make it executable, i.e run
1
2
# chmod a+x /etc/init.d/noip2# update-rc.d noip2 defaults
V2Ray Linux 安装V2Ray
V2Ray Install
在Debian服务器上root权限执行以下命令
1 # bash <(curl -L -s https://install.direct/go.sh)
命令执行成功之后会增加v2ray服务
编辑 /etc/v2ray/config.json 文件来配置你需要的代理方式;
启动 V2Ray 进程
之后可以使用 service v2ray start|stop|status|reload|restart|force-reload 控制 V2Ray 的运行。
注:Linux(ubuntu)客户端安装方法跟服务器相同
配置V2Ray 需要用到的信息: UUID,服务器监听端口,服务器地址(域名或IP),客户端本地监听端口
配置文件需要用到UUID,可以用以下网址生成UUID
UUID生成器
服务器配置文件/etc/v2ray/config.json 1 2 3 4 5 6 7 8 9 10 11 12 13 14 15 16 17 18 19 20 21 22 23 24 25 26 27 28 29 30 31 32 33 34 35 36 37 38 39 40 41 42 43 44 45 46 47 48 49 50 51 52 53 54 55 56 57 58 59 60 { "log" : { "access" : "/var/log/v2ray/access.log" , "error" : "/var/log/v2ray/error.log" , "loglevel" : "warning" } , "inbound" : { "port" : 50443 , "protocol" : "vmess" , "settings" : { "clients" : [ { "id" : "80790edf-3960-971e-a778-46c32f294320" , "level" : 1 , "alterId" : 100 } ] } } , "outbound" : { "protocol" : "freedom" , "settings" : { } } , "inboundDetour" : [ ] , "outboundDetour" : [ { "protocol" : "blackhole" , "settings" : { } , "tag" : "blocked" } ] , "routing" : { "strategy" : "rules" , "settings" : { "rules" : [ { "type" : "field" , "ip" : [ "0.0.0.0/8" , "10.0.0.0/8" , "100.64.0.0/10" , "127.0.0.0/8" , "169.254.0.0/16" , "172.16.0.0/12" , "192.0.0.0/24" , "192.0.2.0/24" , "192.168.0.0/16" , "198.18.0.0/15" , "198.51.100.0/24" , "203.0.113.0/24" , "::1/128" , "fc00::/7" , "fe80::/10" ] , "outboundTag" : "blocked" } ] } } }
客户端配置文件/etc/v2ray/config.json 1 2 3 4 5 6 7 8 9 10 11 12 13 14 15 16 17 18 19 20 21 22 23 24 25 26 27 28 29 30 31 32 33 34 35 36 37 38 39 40 41 42 43 44 45 46 47 48 49 50 51 52 53 54 55 56 57 58 59 60 61 62 63 64 65 66 67 68 69 70 71 72 73 74 75 76 77 78 79 80 81 82 83 84 85 86 87 88 89 90 91 92 93 94 95 96 97 98 99 100 { "log" : { "access" : "/var/log/v2ray/access.log" , "error" : "/var/log/v2ray/error.log" , "loglevel" : "warning" } , "inbound" : { "listen" : "127.0.0.1" , "port" : 2080 , "protocol" : "socks" , "settings" : { "auth" : "noauth" , "udp" : true , "ip" : "127.0.0.1" } } , "outbound" : { "protocol" : "vmess" , "settings" : { "vnext" : [ { "address" : "myname.ddns.net" , "port" : 50443 , "users" : [ { "id" : "80790edf-3960-971e-a778-46c32f294320" , "level" : 1 , "alterId" : 100 } ] } ] } } , "outboundDetour" : [ { "protocol" : "freedom" , "settings" : { } , "tag" : "direct" } ] , "routing" : { "strategy" : "rules" , "settings" : { "rules" : [ { "type" : "field" , "port" : "54-79" , "outboundTag" : "direct" } , { "type" : "field" , "port" : "81-442" , "outboundTag" : "direct" } , { "type" : "field" , "port" : "444-65535" , "outboundTag" : "direct" } , { "type" : "field" , "domain" : [ "gc.kis.scr.kaspersky-labs.com" ] , "outboundTag" : "direct" } , { "type" : "chinasites" , "outboundTag" : "direct" } , { "type" : "field" , "ip" : [ "0.0.0.0/8" , "10.0.0.0/8" , "100.64.0.0/10" , "127.0.0.0/8" , "169.254.0.0/16" , "172.16.0.0/12" , "192.0.0.0/24" , "192.0.2.0/24" , "192.168.0.0/16" , "198.18.0.0/15" , "198.51.100.0/24" , "203.0.113.0/24" , "::1/128" , "fc00::/7" , "fe80::/10" ] , "outboundTag" : "direct" } , { "type" : "chinaip" , "outboundTag" : "direct" } ] } } }
最后,Chrome/Firefox安装Proxy SwitchyOmega插件,设置代理为127.0.0.1:2080就可以通过代理上网了。